Celebrated on May 1st, Beltane is celebrated in Gaelic and pagan cultures as the beginning of the summer season. Flowers, fertility–and fire!–are motifs of Beltane, and a ribboned Maypole is one of the more recognizable elements of a Beltane festival. Woven ribbon headbands or flower wreaths are also easy, festive ways to acknowledge this ancient holiday. But masks to honor the season are also fun!
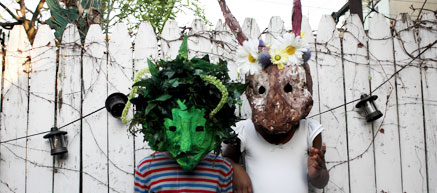
There is no easier, cheaper, less messy and more forgiving way to craft a great mask than with tin foil and masking tape. It’s pliable and light and the process is entirely intuitive. The possibilities are endless! We made a rabbit princess mask for my daughter, since rabbits are symbolic of spring, and for my son, a version of the Green Man–a vegetation diety who appears in cultures the world round when summer arrives.
Materials
Aluminum foil (do NOT use the “non-stick” kind)
Masking tape (the more expensive, stronger tape is better)
Paint, sequins, fabric, silk flowers and leaves, anything you want for your mask decor
Instructions
1. Begin by molding a double-thickness of foil over your child’s face and head. (These masks are made to cover the top of the head as well so there is no need for a string or elastic.) You want to make a mask that is custom-fitted to your child’s head and face, but at the same time, you don’t want it to be too constricting or close-fitting, so pick a few notable facial landmarks (my son’s chin comes to mind) to use as “matching” points between mask and face. It will take a few sheets of foil, taped together, to get this entire first layer, and it will be the layer with which you need to use the most care.
2. Start covering this foil “mold” with a layer of masking tape on both sides. This is a difficult step; you want to retain as much of the original shape as possible, but just the act of pressing the tape onto the foil will work it out of shape slightly. You will have a few re-fittings of the basic mask on your kid’s head at this point, and it may feel a little frustrating, but press on.
3. If there are odd bits sticking out at the edges–extra foil–just have them do what foil does best, and squish them towards the main part of the mask and tape over them.
4. Two layers of masking tape on both the inside and the outside of the foil base should be good for a basic mask. Have your kid try it on again and mark eyeholes and a mouth or nose hole.
5. Now, you can begin to build prosthetic features onto your mask. A nose, a bigger chin, large cheeks, ears–anything you wish. To make our hare’s face, all I did was google a few photos of brown hares and start mushing up balls of foil and pressing them to the basic mask, then putting a layer of tape on them to hold them in place. If they were too full, I smooshed them down more, if they were not full enough, I added more foil and tape. Once your basic mask is stable, it’s almost like working with clay.
6. When you have just the shape you want, you may want to cover the entire mask with a layer of papier mache. This would smooth the entire surface and eradicate all the little “pockets” that result from the layers of tape. We were going for a faster, low-mess version, and so we did not use the papier mache, but just painted directly onto our final masking tape layers. Silk flowers were added for a crown for the Hare Princess, and the Green Man–well, obviously, he had a lot of leaves! (All of these were applied with a hot glue gun because of their weight and because of the age of the kids involved–other materials would be fine adhering with non-toxic craft glue.)
Now, cavort around your Maypole!















[…] BABA MARTA and ST. DAVID’S DAY (march 1) BELTANE (may 1) […]
[…] minitutorial is the final word on this technique, mostly because it contains no words. i tried to write the technique up with words once, but i honestly don’t think it helped to do so. you really. just. do […]